| |
The
Winnipeg Grenadiers to the Mainland
The situation on the Mainland was critical. Brigadier Wallis was
under heavy attack and was forced to withdraw all his troops to
the island. To cover their withdrawal Maltby ordered "D" Company
of the Winnipeg Grenadiers to the mainland to hold the line
while the Royal Scots, the 2/14 Punjabs and the 5/7 Rajputs
moved to Kowloon for evacuation.
The Grenadiers were under the command of Captain Alan Bowman who
had been a school teacher in Winnipeg. He used his men with
great skill, holding off the Japanese time and again as the
Royal Scots, Rajputs and Punjabis began the move back to the
island.
The 2/14 Punjabs began to withdraw on December 10/11 moving
under cover of darkness.. The 5/7 Rajputs, having protected
their withdrawal by holding the vital position of Devil's Peak
from the Japanese, followed. Had the Rajputs lost Devil's Peak,
the entire mainland force would have been in dire straits. With
the Grenadiers in position to cover the withdrawal of the
Rajputs they began their march to Kowloon.
On December 12, the Royal Scots were the first to reach Kowloon.
With the arrival of the Rajputs and the Punjabis in Kowloon
transport was arranged to take them to the Island of Hong Kong.
They used every form of water transport at hand, but the main
stay of the operation was the fleet of MTB's. Their
participation was critical to the successful withdrawal.
In the meantime Captain Bowman, still fighting a rear guard
action, awaited instructions to withdraw "D" Coy of the
Grenadiers. It never came. Finally, on his own initiative,
Captain Bowman led his troops to the ferry docks at Lye Mun and
sent word to HQ on the island that he was coming, and to expect
his arrival. He advised he was going to use the ferry to make
the crossing. He was told ... "The ferry is no longer running".
A half mile of open water is a bit of a swim for a soldier
loaded down with equipment, so Lt. Wilfred Queens-Hughes,
Transport Officer for the Grenadiers approached the ferry boat
Captain and ... at gun point ... persuaded him to make the
crossing. Much to the surprise of the Grenadiers a funeral
cortège, complete with a horse-drawn hearse, crowded aboard and
made the trip to Hong Kong with them. With the Japanese at their
backs "D" Company of the Winnipeg Grenadiers were the last to
cross from Kowloon to Hong Kong. A twenty year old farm boy from
Manitoba, John Grey, missed the ferry, was captured by the
Japanese ... and executed. Grey entered the history books as the
first Canadian infantry man to die in WWII.
The first demand for surrender came from the Japanese even as
the mainland troops were crossing to the island. It was
summarily refused by the Governor.
The East and West Brigades
During the fighting on the mainland General Maltby had decided
to divide the island into two halves along a North/South line
that ran from Causeway Bay in the North to Chung Am Kok in the
South. The units were layered back in depth. The plans assumed
the attack would come from the sea.
.
The East Brigade was under the command of Brigadier Wallis. He
had positioned "B" Company of the Royal Rifles in the front
lines beside the line dividing the two Brigades, To their East,
on the other side of the bay was the Royal Rifles "A" Company.
To the rear between "A" and "C" Companies, was "D" Company, RR
of C. Behind them, in reserve was "C" Company, and in the rear
echelon were the 5/7 Rajputs, there to rest and recover from
their fighting on the mainland. Strategically placed in the
pockets between the Royal Rifle Companies were units of the
HKVDC, The Royal Artillery, Mortar Units, Machine Guns and The
East Brigade Headquarters.
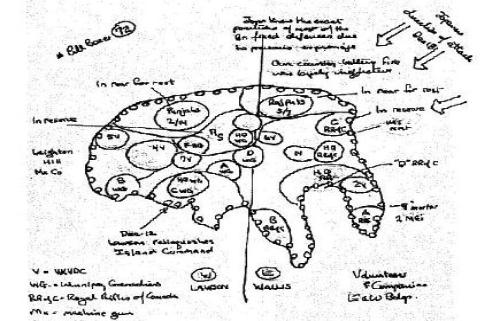
The West Brigade was under the command of Brigadier John Lawson.
Their western flank, manned by "C" Coy if the Winnipeg
Grenadiers, was beside "B" Coy of the Royal Rifles. To their
West was "B" Coy, W.G., and in the center, behind "C" & "B" was
"A" Coy, W.G. In reserve was "D" Coy, W.G., and in the rear
echelon were the 2/14 Punjabs resting and recovering. Again, in
the pockets between the Grenadier Companies were HKVD troops,
and The Royal Scots who were guarding the Brigade H.Q. General
Maltby's Head Quarters were in the middle of the West Brigade.
"D" Company, Royal Rifles of Canada Defense
Deployment
"D" Company of the Royal Rifles of Canada occupied Obelisk Hill,
an excellent defensive position on high ground with excellent
lines of fire, on a front 1500 yards wide and 1000 yards deep.
It also had 17 below ground bunkers that could house 9 men each.
The strength of the Company varied between 250 and 124 men,
depending on the demands that were put upon them.
"D" Company had a variety of other support units attached to it
such as a mortar unit, 29 men of the Middlesex Machine Gun
Regiment, an artillery battery, a search light unit, a staff of
clerks, drivers, dispatch riders, and cooks.
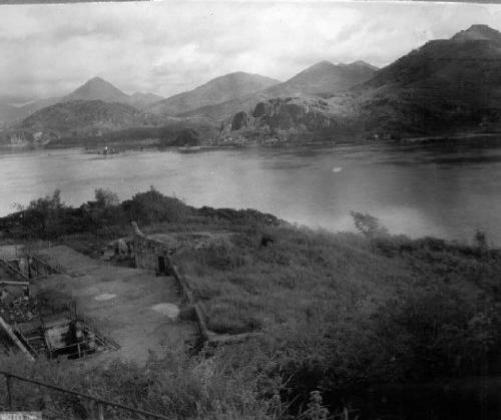
"D" Company, Royal Rifles of Canada's
position on Obelisk Hill
________________________________________
|